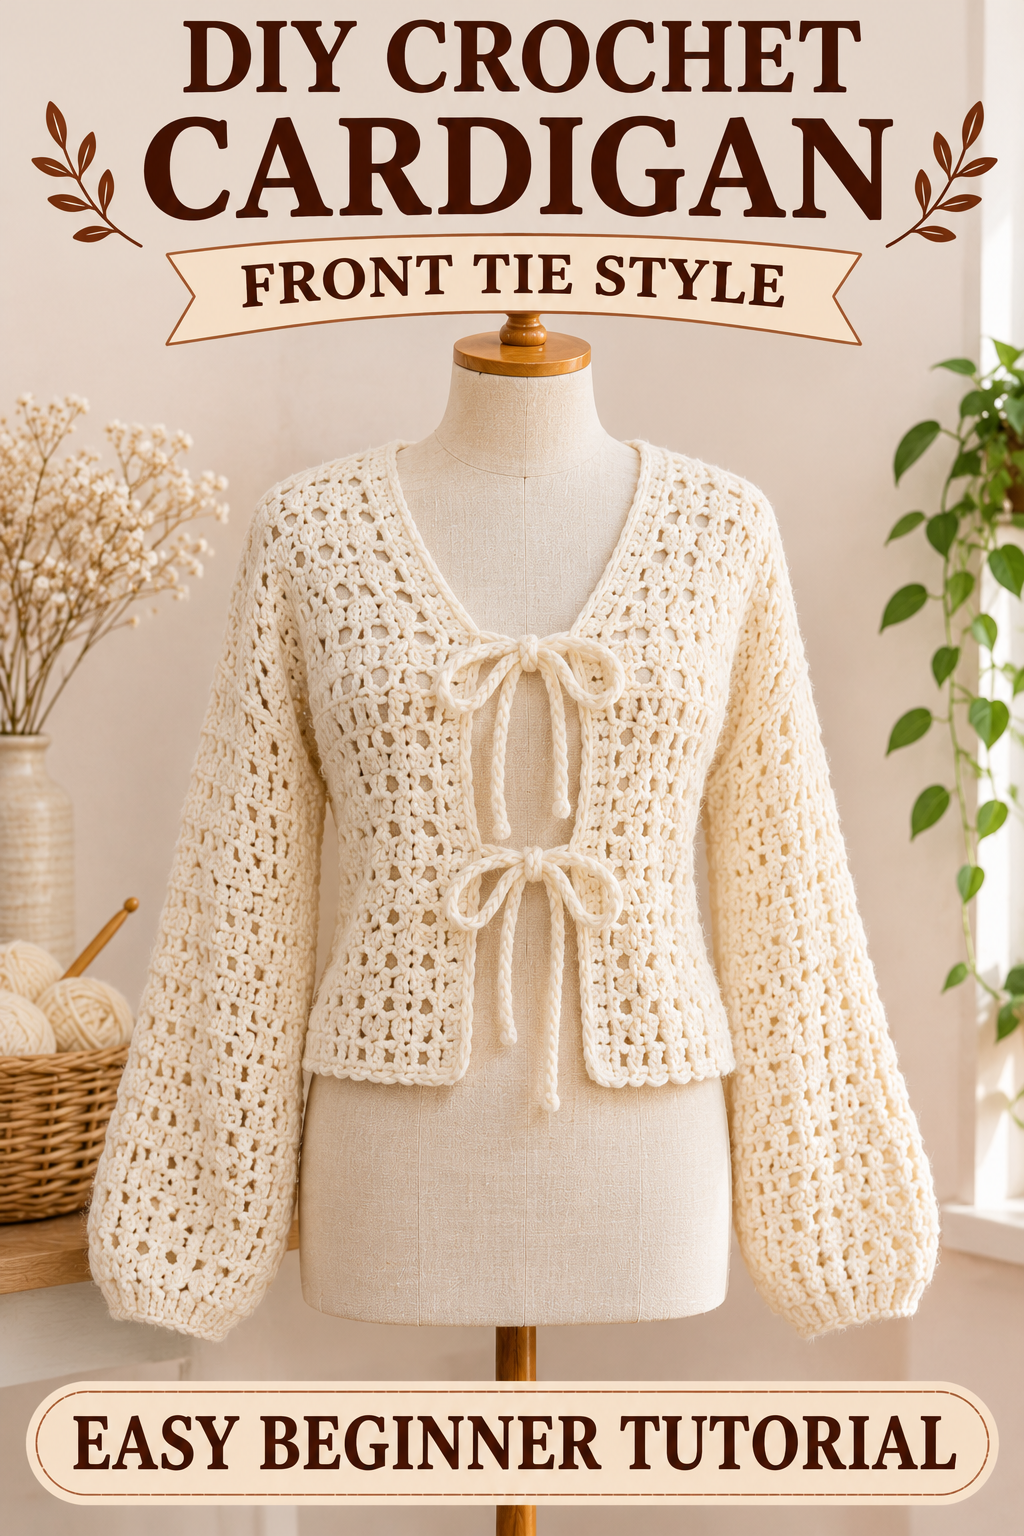
If you have ever looked at a handmade cardigan and thought, “I could never make that,” I want you to stay with me for the next few minutes. This crochet front tie cardigan looks like something you would find in a boutique, yet it is built from simple rectangles and gentle shapes that a true beginner can handle. There is no complicated shaping, no tricky stitch you have to memorize, and no pressure to get everything perfect on the first try. You work one panel at a time, you join them together, and you finish with a soft little bow that makes the whole piece feel special.
In this tutorial I will walk you through everything from choosing your yarn to tying the final bow. I will explain each stage the way I would if we were sitting at the same table with a cup of tea between us. Take your time, read through the whole thing once, and then come back to each section as you work. By the end you will have a cozy, airy cardigan in a creamy neutral shade that goes with absolutely everything in your closet.
Why This Front Tie Cardigan Is Perfect for Beginners
Many crochet garments scare new makers because they imagine hundreds of stitch counts and confusing math. This cardigan is different, and here is why. The stitch pattern is a simple mesh that repeats the same small sequence over and over. Once you have worked two or three rows, your hands will remember the rhythm and you can relax into it. The open, lacy texture also hides tiny tension differences, so your work looks even and polished without you having to fuss.
The construction is just as friendly. You make a back panel, two front panels, and two sleeves. Each piece is worked flat, which means you simply crochet back and forth in rows. There are no seamless yoke calculations and no rounds to track. If you can make a chain, work a double crochet, and sew two edges together, you already have every skill you need.
The front tie closure is another reason I love this design. Buttons require buttonholes, and buttonholes require planning. A tie simply needs a long chain, and it adjusts to your body beautifully. It also gives the cardigan a soft, romantic look that works for spring picnics, cool summer evenings, and layering over a plain tee in autumn.
Materials You Will Need
Let me start with the yarn, because it makes the biggest difference in how your finished cardigan looks and feels. For this project I recommend a smooth worsted weight yarn in a cotton and acrylic blend or a soft pure cotton. A cream or ivory shade shows off the mesh texture wonderfully, since the little openings create gentle shadows that make the stitches pop. Wool can work too, but a blend with some cotton keeps the fabric light and breathable, which is exactly what you want for an open mesh design.
How much yarn should you buy? For a small to medium size, plan on roughly 800 to 1000 yards. For a large or extra large, bring that closer to 1200 to 1500 yards. It is always better to buy one extra skein than to run out halfway through a sleeve, especially since dye lots can vary slightly between purchases. If you are unsure, buy a little more and keep the receipt in case you can return any unused balls.
For your hook, a 5 millimeter size is a great starting point with worsted weight yarn. If you tend to crochet tightly, move up to a 5.5 millimeter. If your stitches usually come out loose and floppy, drop down to a 4.5 millimeter. The best way to decide is to make a small swatch first, which I will explain in the next section.
Beyond the yarn and hook, you will want a pair of sharp scissors, a yarn needle with a large eye for sewing seams, a measuring tape, and a handful of stitch markers. Stitch markers are especially helpful when you are joining panels, because they hold your edges in place while you work. A cute little dish to keep them in does not hurt either. You may also want a smaller hook, around 4 millimeters, for the ribbed cuffs if you prefer a snugger fit at the wrists.
Getting Started with a Beginner Friendly Swatch
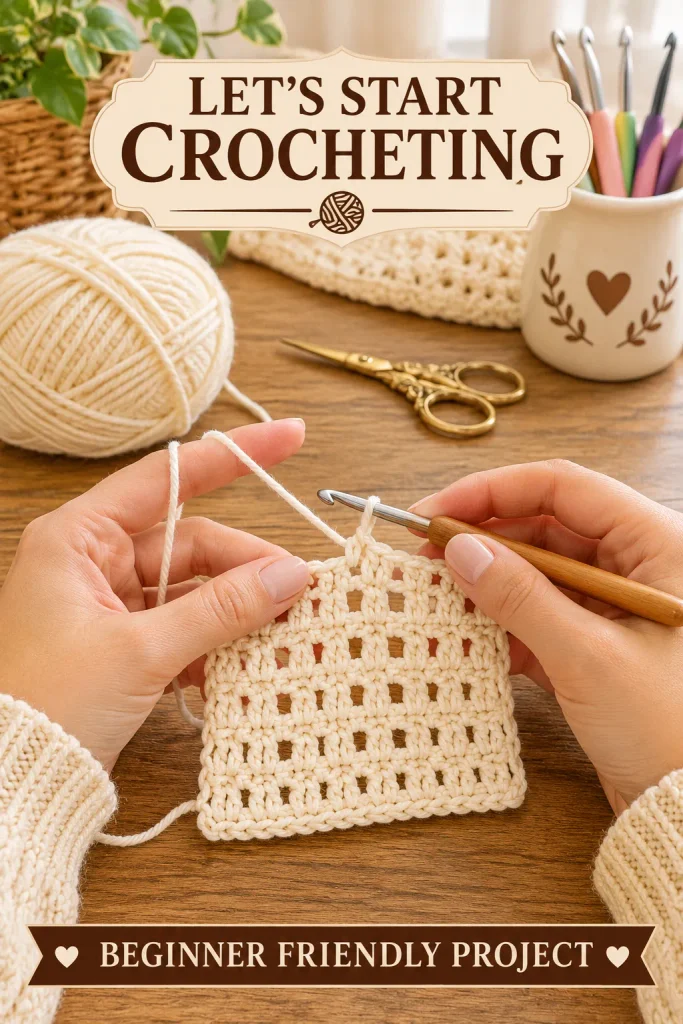
Before you start the real thing, please make a swatch. I know, I know. Nobody gets excited about swatching. But a swatch is your best friend, especially when you are making clothing. It tells you whether your yarn and hook are creating a fabric you enjoy, and it shows you how many stitches fit into a measured space, which helps you choose the right size.
To make your swatch, chain 22. This gives you a base that is easy to work and large enough to measure. The mesh stitch is built on a simple alternating idea. You work a double crochet, then chain one and skip a stitch, and you repeat that across the row. On the next row, you place your double crochets into the chain spaces from the row below, so the stitches stagger and form that lovely diamond shaped lattice you see in the photo.
Here is how a row goes in plain words. Chain three at the start of the row to stand in for your first double crochet. Then chain one, skip the next stitch or space, and work a double crochet into the following stitch or space. Keep repeating that little rhythm of chain one, skip, double crochet until you reach the end. On the following row, turn your work, chain three, and work your double crochets into the chain one spaces of the previous row. That stagger is what creates the open diamond look.
Work about eight to ten rows, then lay your swatch flat and measure it. Count how many stitches and rows fit into four inches. Write those numbers down on a sticky note and tuck it into your project bag. This is your gauge. If your swatch is wider than the pattern guide below suggests, go down a hook size. If it is narrower, go up one. Do not skip this step, because it is the difference between a cardigan that fits like a dream and one that ends up as a gift for a cousin.
While you are swatching, pay attention to how your hands feel. Beginners often grip the hook too tightly, which creates stiff fabric and tired fingers. Try to hold your hook like a pencil or a knife, whichever feels natural, and let the yarn glide through your fingers. Relaxed hands make better crochet, and better crochet makes a cardigan you will actually want to wear.
Understanding the Sizing and Measurements
Crochet clothing is wonderfully forgiving, but you still want a good starting point. Grab your measuring tape and take a few simple measurements. Measure around the fullest part of your bust, then add about two to four inches for ease. This extra room gives the cardigan that relaxed, slightly cropped fit you see in the photos. Next, measure from the back of your neck down to where you would like the hem to fall. For a cropped tie cardigan, somewhere between the bottom of the ribcage and the natural waist is lovely.
You will also need your sleeve length, measured from the underarm to the wrist, and the width of your upper arm. Write all of these down. Having them on paper makes the whole project feel less mysterious, because you are no longer guessing. You are simply crocheting panels to match numbers.
As a general guide, your back panel should be about half of your finished bust measurement in width, and each front panel should be about a quarter of it, plus a little extra for the V shaped neckline overlap. Do not worry if this sounds technical. Once you start measuring your actual panels against your own body, it becomes very intuitive. Hold each piece up to yourself as you go. Crochet is bendy, and you can make small adjustments along the way by adding or removing a row.
Building the Cardigan Panels
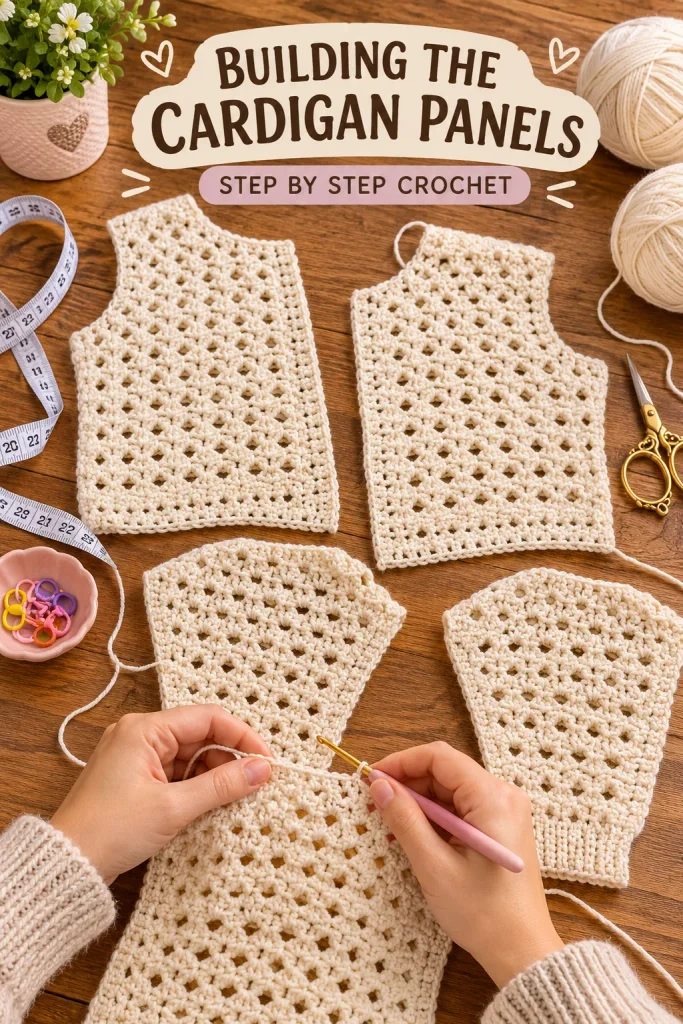
Now we get to the heart of the project. Look at the photo above and you will see four separate pieces laid out like puzzle parts. Two are the front panels, one is the back, and the others are the sleeves. Seeing them spread out like this is one of my favorite parts of making a garment, because it proves that something that looks complicated is really just a handful of simple shapes.
The Back Panel
Start with the back, since it is the largest and the most straightforward. Chain enough stitches to reach the width you calculated, making sure your total is an odd number so that your mesh pattern lines up. Work your first row of double crochet and chain one spaces across, then keep repeating the staggered mesh row after row.
Work straight, without any shaping, until your piece measures about two inches shorter than the point where your armholes should begin. Then you will begin a gentle shaping for the armholes. At the start of the next two rows, slip stitch across a few stitches to bind off a small section. This creates the little step you can see on the shoulder area of the panels in the photo. Continue working straight on the remaining stitches until the back is tall enough to reach your shoulder, and then fasten off.
Take a moment to admire your first finished piece. It will look a bit wide and floppy, and that is perfectly normal. Crochet fabric needs to be blocked, which we will talk about in a bit, and it transforms once it is shaped and dried.
The Front Panels
The two front panels mirror each other, so make one, then make the second to match. Each is roughly half the width of the back, minus a little, and each includes a sloped edge that creates the V neckline. Start by chaining the width you need and working straight in your mesh pattern, just like the back.
When you reach the armhole height, you will begin decreasing along the neckline edge. This is the only slightly new skill in the whole pattern, and it is very gentle. At the neckline edge of every second or third row, you will skip one stitch space instead of working it, which slowly slants the edge inward. This creates the angled V shape. On the opposite edge, you do the same armhole bind off that you did on the back.
If decreasing feels intimidating, here is a friendly trick. Place a stitch marker at the neckline edge on every row where you plan to decrease. That way you never lose your place, and you can glance down and know exactly what to do. Keep decreasing until the shoulder width is about the same as the shoulder on your back panel, then fasten off.
To make the second front panel a mirror image, simply work the decreases at the opposite end. Lay both fronts on your table beside the back panel, and check that the shoulder lengths match. If one is a row or two off, no problem. You can add or remove a row on a later piece, or simply ease it in when you sew.
The Sleeves
The sleeves in this cardigan have a soft, slightly gathered look at the cuff, and the mesh pattern continues all the way down. Begin at the top of the sleeve, where it will join the shoulder. Chain a number of stitches that match your upper arm width plus a little ease, and work in the same staggered mesh. Then, as you work downward row by row, decrease gently at both edges, skipping a stitch space every fourth or fifth row, until the sleeve narrows to about the width of your wrist plus an inch or two.
The narrowing gives your sleeve that lovely tapered shape. If you prefer a roomier, more dramatic sleeve, simply decrease less often so the cuff stays wider. If you like something closer fitting, decrease a little more. Remember that you are the designer here, and the pattern is only a guide.
For the cuffs, you can add a short ribbed band, which gives the sleeves a snug, finished edge and a nice contrast to the open mesh. To make the ribbing, switch to your slightly smaller hook, chain about ten stitches, and work rows of half double crochet worked into the back loop only. After enough rows to wrap around your wrist, sew the short ends together and attach the band to the bottom of the sleeve. The result looks just like knitted ribbing, but with all the ease of crochet.
Make two identical sleeves. Do not forget to count your rows on the first one and write the number down, because it is surprisingly easy to forget what you did by the time you reach the second.
Blocking Your Panels Before You Assemble
Here is a step that many beginners skip, and I want to gently convince you not to. Blocking means wetting or steaming your crochet and pinning it to a flat surface so it dries in the exact shape you want. For an open mesh cardigan, blocking is the secret to crisp, even stitches and clean edges.
Lay a clean towel on a flat surface, such as a bed or a foam mat. Gently dampen each panel with a spray bottle or soak it in lukewarm water with a drop of mild wool wash, then press out the extra water in a towel. Lay the piece on your blocking surface and pat it into shape, using your measuring tape to check the dimensions. Pin the edges lightly so they stay straight, and let everything dry fully before you move on.
You will be amazed at the difference. The mesh opens up, the stitches settle, and the pieces become much easier to match and sew together. It also makes it simpler to see if one panel is slightly larger than another, which means you can fix it before it becomes part of the finished garment.
Assembling Your Cardigan
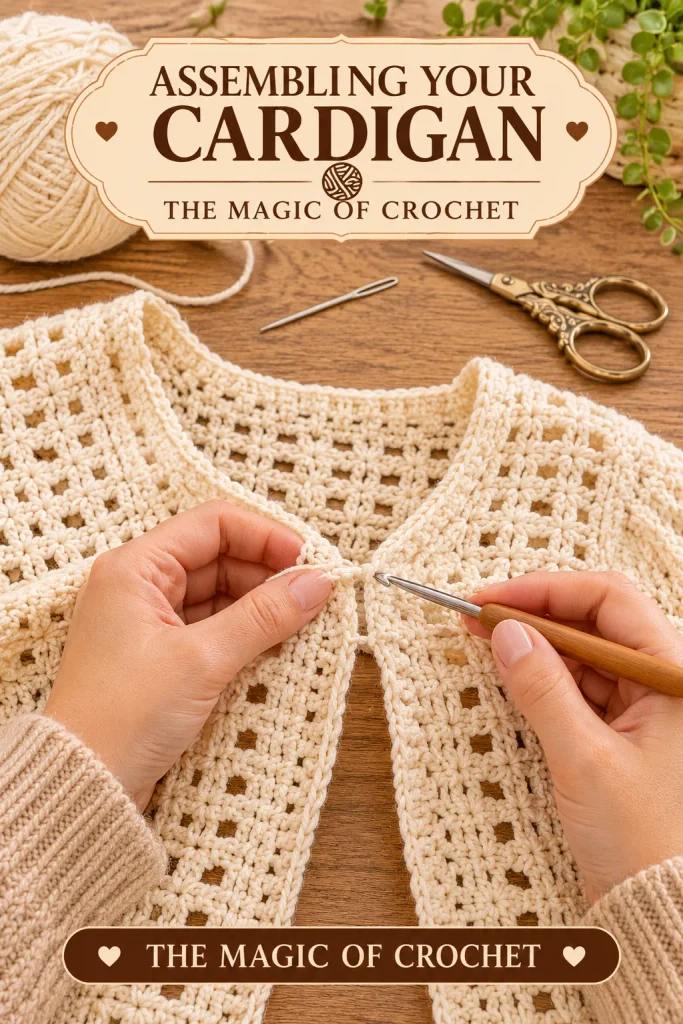
This is the moment when your pile of pieces turns into something you can wear. Do not rush it. Take a breath, lay everything out, and work slowly. The assembly stage is where careful work pays off the most, and it is also surprisingly satisfying.
Joining the Shoulders
Start with the shoulder seams. Place the back panel and one front panel with their right sides together, meaning the pretty sides face each other. Line up the shoulder edges and secure them with a few stitch markers so nothing shifts. Using your hook, you can join them with a slip stitch seam, working through both layers one stitch at a time. This creates a neat, slightly raised seam that adds a bit of structure to the shoulder.
Alternatively, you can use a yarn needle and a whip stitch or mattress stitch to sew the seam. Both methods work beautifully, so choose whichever feels more comfortable. I personally like the slip stitch method for beginners, because it uses the same hook you have been holding all along, and you can easily see what you are doing.
Repeat the same process for the second shoulder. When both shoulders are joined, open the piece flat and look at it. You should see a wide shape with a V neckline at the front and a straight line across the back.
Setting In the Sleeves
Now for the sleeves. Find the center of the top edge of each sleeve and match it to the shoulder seam. Pin or clip the sleeve in place, then work outward from the center to either side, easing the fabric so it sits smoothly around the armhole. Because crochet stretches, you have plenty of flexibility here. If the sleeve is slightly bigger than the armhole, gently gather it in as you go.
Join the sleeve using the same method you used for the shoulders. Work slowly, checking the right side often to make sure the seam looks neat. When both sleeves are attached, you will suddenly see the cardigan take shape, and honestly, it is a little thrilling.
Closing the Side and Sleeve Seams
With the sleeves in place, fold the cardigan so the underside of each sleeve lines up with the side edge of the body. Starting at the cuff, join the sleeve seam all the way up to the underarm, and then continue straight down the side of the body to the hem. Using one continuous seam keeps everything tidy and prevents a bump at the underarm.
Take your time at the underarm point, where the sleeve and body meet. This area is the most common trouble spot, and a little extra care here makes the whole garment feel more professional. Make sure your stitches are snug but not tight, since an overly tight seam can restrict movement.
Weave in any loose ends as you go. It is far easier to hide them now than after the whole cardigan is complete. Thread each tail onto your yarn needle and weave it back and forth through the stitches for a couple of inches, then trim the excess.
Finishing the Edges
Before you add the ties, give your cardigan a clean edge all around. This step makes a huge difference in the final look. Attach your yarn at the bottom corner of one front panel, and work a round of single crochet along the front edge, up around the neckline, and back down the opposite front. Work evenly spaced stitches, usually about one single crochet for every row end and one into each stitch or chain space along the edges.
At the corners, such as where the neckline meets the shoulder, add an extra stitch or two so the edge lies flat instead of curling. If you find the edge looks tight or puckered, try going up a hook size for this round. If it looks wavy or ruffled, go down a size. A smooth, flat border is the frame that makes your mesh look intentional and elegant.
You can also work a second round of single crochet or a round of reverse single crochet, sometimes called crab stitch, for a slightly twisted, rope like finish. It adds a subtle texture that looks lovely against the open mesh. Whichever you choose, the border gives your cardigan a crisp, store bought appearance.
Adding the Final Details

Here comes the best part, the front ties. This is the little detail that turns a simple cardigan into a charming, feminine piece. Do not worry, it is much easier than it looks.
Making the Ties
Each tie is simply a long chain, and for a stronger, rounder look you can add a row of single crochet along the chain. Decide where you want your tie to sit. In the photo, the ties are attached at the point where the V neckline meets the front edge, a little below the bust, so the bow rests right at the center of the chest.
Attach your yarn at that spot on the inside edge of the right front panel. Chain about 30 to 40 inches, depending on how long you want your tails to be. A longer tie lets you wrap or tie a bigger bow, while a shorter one gives a daintier look. To make the tie sturdier, turn your chain and work a single crochet into the back bump of each chain stitch all the way back to the start. This creates a slim, cord like tie that holds its shape and does not stretch out of proportion.
Fasten off, leaving a small tail, and weave the tail securely into the cardigan edge. Repeat the entire process on the left front panel so you have two matching ties.
Choosing Where to Place the Ties
Try on your cardigan and look in the mirror before you attach the ties permanently. Hold the two front edges together and see where they naturally want to meet. Some people prefer the tie higher for a snug, cropped look, while others like it lower for a softer drape. Mark your preferred spot with a stitch marker, and attach the ties exactly there.
If you want an extra secure bow, add a second pair of ties on the inside, a few inches below the first. These are like little hidden fasteners that keep the cardigan from sliding open, and you tie them together in a small knot where nobody will see.
Weaving In the Last Ends
With your ties attached, go over the whole cardigan one more time and weave in every last tail. Use your yarn needle to hide ends deep within the stitches, and trim them close. Turn the cardigan inside out and check that nothing looks loose or unfinished. Then give the whole piece one more gentle steam or light blocking so the seams and ties settle into place.
Styling Your Crochet Front Tie Cardigan
Now for the fun part, wearing it. This cardigan is wonderfully versatile because of its soft neutral color and airy texture. Layer it over a simple white tee and your favorite jeans for an easy everyday outfit. Wear it over a sundress on a cool evening, and the bow gives the look a sweet, romantic touch. It also looks great with high waisted trousers and a camisole when you want something a little more polished.
Because it is cropped, it pairs especially well with high waisted bottoms. A flowing midi skirt creates a lovely balance of proportions, while a pair of wide leg pants gives it a modern, relaxed feel. If you want to try different looks, experiment with the bow. A big, loose bow feels casual and playful, while a small, tight knot looks neat and understated. You can even tie the ends in the back for a wrap style.
If you made your cardigan in a cream or ivory shade, it works as a perfect canvas for accessories. Add a simple pendant necklace, a straw tote, or a pair of dainty earrings. And of course, if you love color, you can make a second one in soft sage, dusty rose, or buttery yellow. Once you have made one, you will be tempted to make a whole collection.
Troubleshooting Common Beginner Problems
Every crocheter runs into a few bumps along the way, so let me share some solutions to the most common ones. If your edges look uneven or wavy, you may be accidentally adding or skipping stitches at the turning chain. Check that you are working into the top of the turning chain on every row, and count your stitches at the end of each row until your hands learn the pattern.
If your mesh looks tight and stiff, you are probably pulling your stitches too snugly. Try loosening your grip, using a larger hook, or consciously letting your chain one spaces stay open and relaxed. On the other hand, if your fabric looks very loose and sloppy, go down a hook size or hold your yarn with a little more tension.
If your panels end up different sizes, do not panic. Block them to the same measurements, and use the mattress stitch to ease the pieces together. A few small differences disappear into the seam. If the difference is large, it is worth ripping back a few rows and fixing it, because it only takes a few minutes and saves a lot of frustration later.
If you run out of yarn mid project, check whether the shop still has the same dye lot. When it does not, you can alternate rows of the old and new skeins for a few rows, which blends the slight color difference so it is not noticeable. This is another reason to buy a little extra at the start.
Caring for Your Handmade Cardigan
You put hours of love into this garment, so treat it kindly. Hand wash it in cool water with a gentle detergent, and avoid wringing or twisting the fabric. Press out the extra water with a clean towel, then lay the cardigan flat to dry, reshaping it with your hands. Never hang a wet crochet garment, since the weight of the water can stretch it out of shape.
When you are not wearing it, fold the cardigan and store it in a drawer or on a shelf rather than hanging it on a hanger. Hanging can stretch the shoulders and leave little bumps. If your yarn is a cotton blend, it should hold its shape well over many wears and washes. With a little care, your cardigan can last for years and become a treasured favorite.
A Few Final Thoughts
Making your first crochet garment is a big step, and I hope this tutorial has shown you that it is far more doable than it seems. You started with a simple swatch, you built panels one row at a time, you joined them into a cardigan, and you finished with a bow that ties it all together. Every stitch along the way was something you learned and practiced, and that is something to be truly proud of.
Do not worry if your first cardigan is not perfect. Honestly, none of mine ever are. The little quirks and uneven spots are part of what makes handmade clothing special. When someone asks where you got your beautiful cardigan, you get to smile and say, “I made it myself.” There is nothing quite like that feeling.
If you enjoyed this tutorial, I would love to hear how your project goes. Share your yarn choice, your color, and any changes you made to make it your own. And if you are looking for your next project, there are plenty of cozy patterns waiting for you, from sweet ornaments to seasonal bags and wreaths. Grab your hook, pick out a soft yarn that makes you happy, and start your very first stitch today. Happy crocheting!