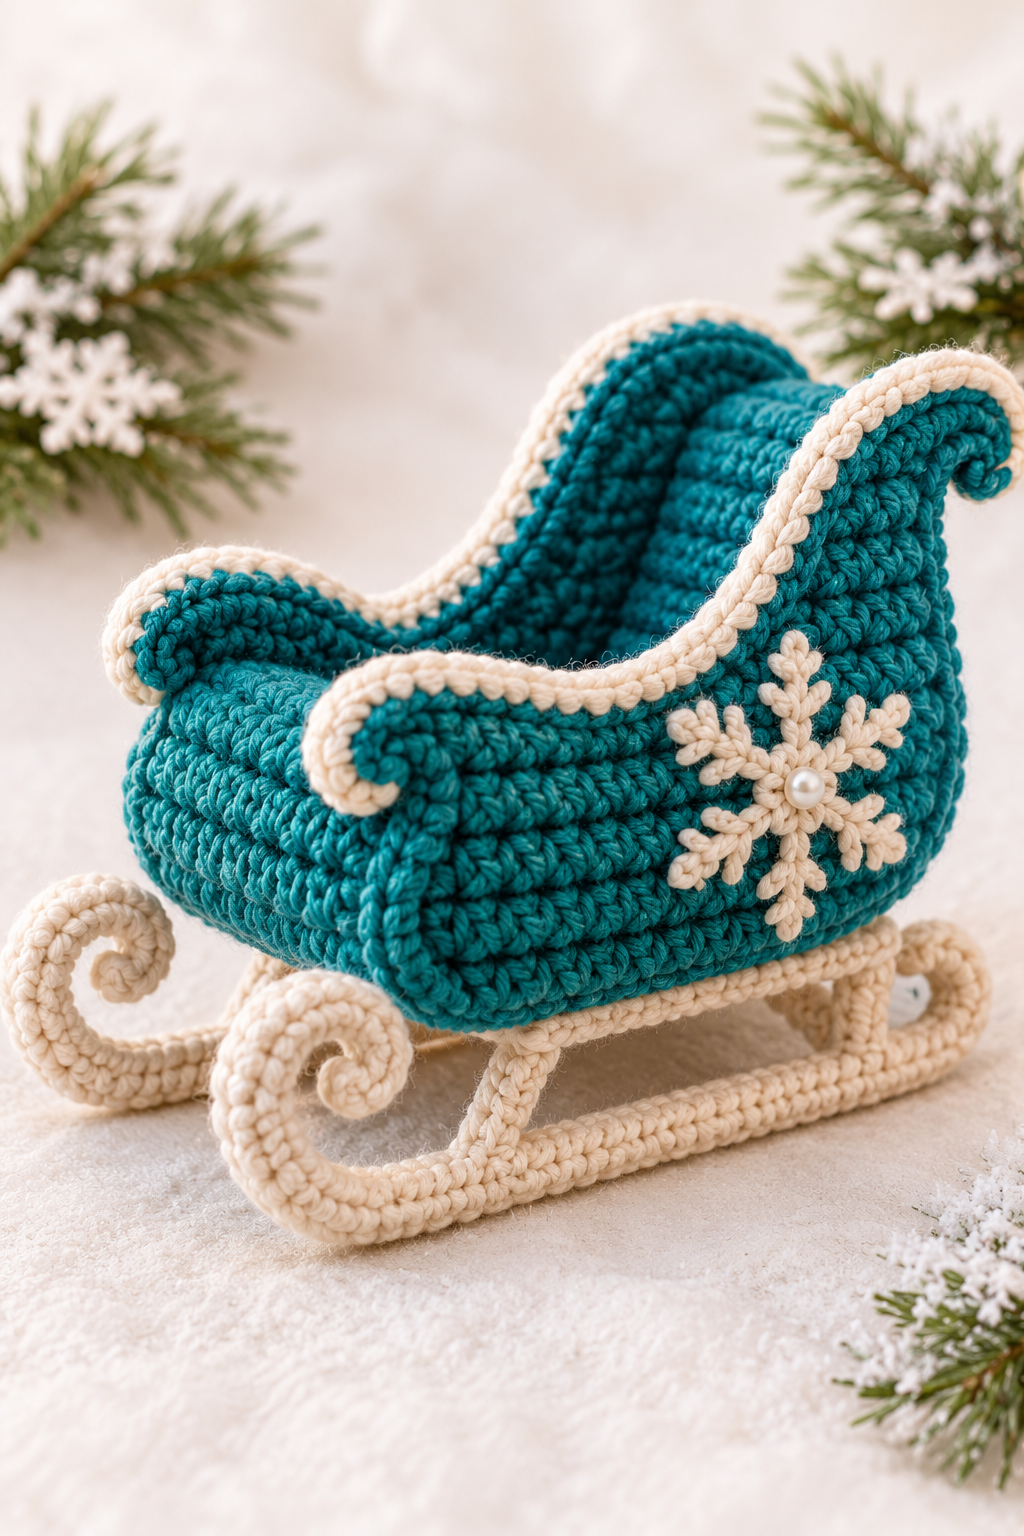
Every year I tell myself I will keep my Christmas making simple, and every year a project like this one comes along and ruins that promise. This time it was a little sleigh. I had a ball of deep peacock teal yarn sitting on my desk, a skein of soft cream beside it, and a head full of ideas about snowy rooftops and glowing lights. By the end of the weekend I had a peacock teal sleigh ornament curled up on my table, and I could not stop looking at it.
If you love beautiful crochet Christmas decor that feels a bit different from the usual red and green, this project is for you. Peacock teal is rich without being loud. It looks wonderful next to gold baubles, frosted pine branches, and warm white fairy lights. Add cream trim and a tiny pearl snowflake, and you have an ornament that looks like it belongs in a vintage storybook.
In this post I will walk you through how I made mine, from the very first oval to the last stitch of the snowflake. I will share what yarn and hooks I used, where I slowed down, what I would do differently, and how you can style the finished sleigh in your home. Grab a cup of something warm and settle in.
Why a Crochet Sleigh Ornament Is Worth Making
A sleigh is one of those shapes that says Christmas without needing any extra explanation. It makes people think of snowy nights, quiet roads, and a little bit of magic. When you crochet one, you get to add your own personality through colour and texture.
What I love most about this ornament is how sculptural it is. It is not a flat motif that you hang and forget. It has a real body, a curved front, and runners that sweep along the bottom. It sits beautifully on a shelf, but it also looks lovely hung from a tree branch or placed in the middle of a festive table.
It is also a great project for crocheters who are ready for something a little more interesting than a basic ornament. You do not need any fancy skills. If you can work single crochet in the round and follow a shape as it grows, you can make this sleigh. Patience is the main ingredient.
Choosing Your Yarn and Colours
The colour story of this sleigh is simple. A deep peacock teal for the body, a creamy off white for the runners and trim, and a small pearl bead for the centre of the snowflake.
I used a smooth worsted weight cotton blend for the teal. Cotton gives very clear stitch definition, which is important here because the body of the sleigh is worked in a tight, dense fabric. A yarn that is too fuzzy will hide the texture, and a yarn that is too slippery will make the shape floppy. A smooth, slightly firm yarn is the sweet spot.
For the cream, I chose a softer yarn with a little warmth to it. Pure white can look harsh against peacock teal, while cream feels gentle and luxurious. If you cannot find peacock teal, look for shades called deep teal, dark turquoise, lagoon, or even a dark blue green. The idea is a jewel tone that feels rich in candlelight.
You will also need a small amount of stuffing if you want the runners to stand out more, a yarn needle, a few stitch markers, and a tiny pearl bead with a sewing needle and thread that matches the cream yarn.
Hooks and Tools
I worked this ornament with a hook that is smaller than the yarn label recommends. For worsted weight yarn, that usually means something around 3.5 mm. A smaller hook creates a tighter fabric, and a tight fabric is what lets the sleigh hold its shape without any hidden support.
In my photos you will see a gold hook with a teal handle, a silver hook with a wooden handle, and a gold hook with a soft pink grip. They are all comfortable, and I swapped between them as I worked. Use whichever one feels best in your hand. A tired hand makes uneven stitches, so comfort really matters.
I also kept a small pair of decorative scissors nearby. They are not necessary, but they make the whole experience feel a little more special, and they are very handy for snipping tiny ends.
Step One: Start with the Oval Base
Every good sleigh begins with a solid floor. The base is a long, narrow oval that will become the bottom of the sleigh body. Getting this part right makes everything that follows much easier.
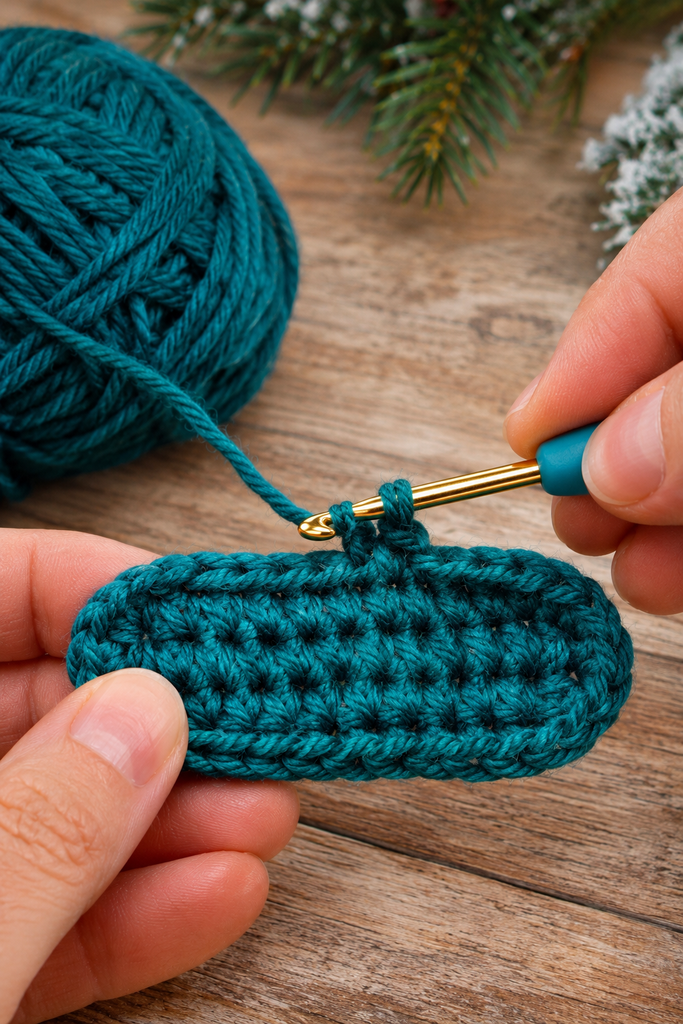
In this photo you can see the oval after a few rounds. The stitches sit neatly side by side, and the edge has a clean, rounded finish. The hook is poised to start the next stitch, and the yarn trails back to the ball in a relaxed curve.
To make the base, I started with a chain a little longer than I wanted the final base to be. Then I worked single crochet along one side of the chain, added three stitches into the end stitch to turn the corner, worked back along the other side of the chain, and added three more stitches into the last stitch. That completes the first round. From there, I increased at both curved ends in each round so the oval grew evenly.
A stitch marker is your best friend here. Place one in the first stitch of each round so you always know where you are. Because the oval is worked in a spiral, it is very easy to lose your place without a marker.
The most common trouble at this stage is a base that ruffles or cups. If it ruffles, you have too many increases at the ends. If it curls up like a bowl, you do not have enough. Lay the oval flat on a table after every round. It should sit perfectly flat, like a smooth little cookie. If it does not, pull back a round and adjust before moving on.
I also like to work the final round of the base into the back loops only. This creates a neat ridge where the floor meets the walls, and it gives the sleigh a defined shape from the very beginning.
Step Two: Build the Walls and Curve the Front
Once the base is ready, the fun begins. This is the stage where a flat shape becomes a three dimensional sleigh.
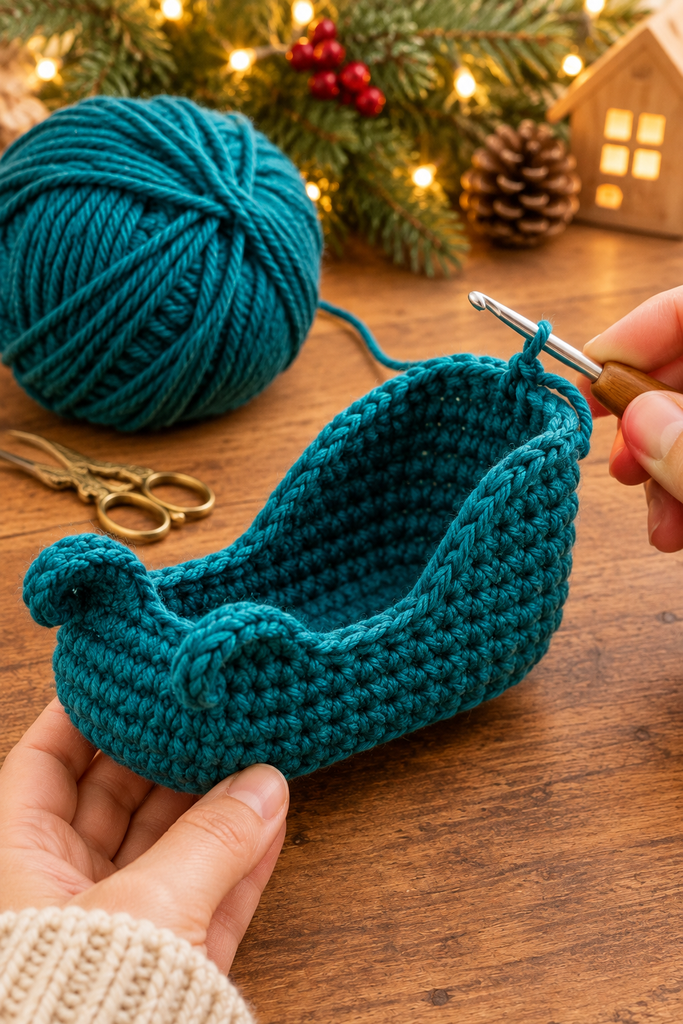
Look at how the walls rise from the base in this picture. The sides are worked straight up in single crochet, and the front and back sweep upward into gentle curves. At the top, you can see the small curled lips that give a sleigh its classic shape.
To build the walls, I worked single crochet in the round without increasing for several rounds. This makes the sides stand tall. Then I started adding shaping. At the front of the sleigh, I worked extra rows over a smaller number of stitches so the front rises higher than the middle. This is done with short rows, where you stop part of the way around and turn, creating a taller section at the ends.
The back of the sleigh is slightly lower than the front, which gives it that graceful, swooping silhouette. If you want a more dramatic curve, work a few more short rows at the front. If you want a more modest curve, keep it lower.
The little curled tips at the corners are made by working a short chain or a few slip stitches, then curling the end around on itself. You can see them clearly in the picture, tucked at the left side of the sleigh like tiny scrolls. I shaped mine by working a few stitches in a tight tube and then securing the tip down with a small stitch so it would hold its curl.
A tip I wish someone had told me earlier. Check the shape often. Hold the sleigh up, turn it around, and look at it from the side. Crochet shapes can look different when you view them from above and from the side, and it is much easier to fix a curve when you spot it early.
Step Three: Add the Cream Runners and Trim
This is the part that transforms the ornament from a teal bowl into a real sleigh. The runners are what give it that elegant, old fashioned look.

In this photo, the cream trim has been worked around the top edge of the sleigh, and the long runner is attached to the bottom with small supports. A curled runner tip is still unattached on the table, with the cream yarn leading up to the hook.
The edge trim is worked in single crochet around the top of the sleigh. I joined the cream yarn at the back and worked all the way around, following the curves carefully. For a thicker, padded look, I worked a second round on top of the first. This gives the edge a rounded, rope like quality that contrasts beautifully with the flat teal body.
The runners are made as long, narrow tubes. I started with a short chain, joined it into a ring, and worked single crochet in the round to create a tube. Then I curved the tube into the right shape and sewed it to the sleigh. The front end curls up into a scroll, and the back end curls in a smaller scroll. If you look at the picture, you can see the spiralled end lying on the table, ready to be shaped.
Between the runner and the body, there are small supports that hold the sleigh above the ground. These are tiny tubes or short chains that I stitched in place. They are slightly tricky, but they add so much character. The little gaps between the supports give the sleigh a delicate, airy feel, which balances the dense body perfectly.
When you attach the runners, use plenty of pins or stitch markers to hold everything in place before sewing. Make sure the sleigh sits level on a flat surface. I check this by placing it on the table and gently pressing down. If it rocks, adjust the supports until it stands steady.
I sewed everything on with a yarn needle, using small, firm stitches that go through the teal fabric without showing too much on the outside. Hide your stitches in the spaces between the teal stitches, and they will disappear.
Step Four: The Snowflake and the Pearl
The final detail is the part that always makes me smile. A snowflake on the side of the sleigh turns it from a lovely craft into something truly special.
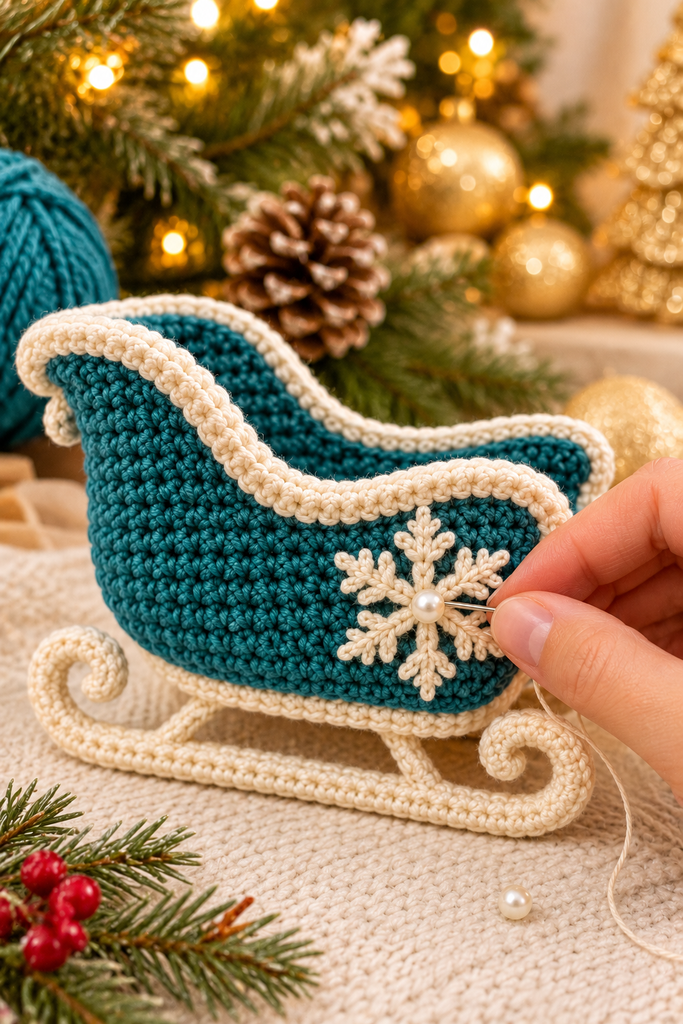
In this photo you can see the completed sleigh surrounded by gold ornaments and soft light. The cream trim frames the teal body, the runners curl at both ends, and the snowflake sits proudly on the side with a small pearl being stitched into its centre.
I made the snowflake separately in cream yarn. It is worked as a small motif with six arms, each with little branches. You can use any snowflake pattern you like, as long as it is small enough to fit on the side of the sleigh. If you do not want to crochet a snowflake, you can embroider one directly on the sleigh with a yarn needle using long straight stitches and tiny crossing stitches for the branches.
Once the snowflake is ready, pin it to the side of the sleigh and sew it on with small stitches around the edge. Take your time and make sure it sits straight. A crooked snowflake is charming, but a centred one looks more polished.
The pearl in the middle is the finishing touch. I used a small pearl bead and a fine needle with cream thread. I stitched through the centre of the snowflake several times to secure the bead firmly, then knotted the thread on the inside. A little pearl catches the light in a way that yarn cannot, and it makes the whole sleigh glow.
If you are making this ornament for a child, you may want to skip the pearl and use a French knot or a small cream stitch instead, so there are no small parts that could come loose.
Finishing Touches and Weaving in Ends
When all the pieces are attached, go over the whole sleigh and look for loose ends. Weave each one carefully into the fabric, passing it through several stitches in different directions before trimming. This keeps the ornament sturdy for years to come.
If you want a little more structure, you can lightly stiffen the sleigh. Some crocheters use a fabric stiffener or a diluted craft glue to give ornaments a firmer shape. I did not need to for this one, thanks to the tight stitches, but it can be helpful if you used a softer yarn.
Add a small loop of cream yarn or thin ribbon to the top of the sleigh if you want to hang it. I attached mine to the back edge so it hangs naturally on a branch without tilting.
How to Style Your Peacock Teal Sleigh Ornament
Once your sleigh is finished, the best part begins. There are so many lovely ways to enjoy it.
On a Christmas tree, a teal sleigh stands out beautifully against deep green branches. Place it near warm lights and gold baubles, and the colours seem to glow. It also looks striking on a white or flocked tree, where the teal becomes a bold accent.
On a mantel or shelf, set it among pinecones, candles, and a few sprigs of pine. The cream trim picks up the soft tones of candlelight, and the teal adds a pop of depth.
As a table centrepiece, fill the sleigh with small ornaments, a few pinecones, or tiny wrapped sweets. It becomes a charming little container that sparks conversation.
As a gift, wrap it in tissue paper and tuck it into a small box with a handwritten note. A handmade ornament feels far more personal than anything from a shop, and it can become a keepsake that a family brings out every year.
You can even make a whole set in different colours. A deep red sleigh, a forest green one, a navy one with silver trim, and your peacock teal one would look wonderful lined up along a windowsill.
Colour Ideas and Variations
Peacock teal is my favourite, but this sleigh looks beautiful in many palettes. A burgundy body with cream trim feels traditional and warm. A dusty blue body with white trim gives a wintry, frosty look. A soft sage green with ivory trim feels natural and calm. A rich plum with gold trim is dramatic and elegant.
You can also change the decoration. Instead of a snowflake, try a small star, a tiny wreath, a holly leaf, or a monogram. A tiny bell sewn to the front curl adds a gentle jingle. A mini pom pom at the back can look like a bundle of gifts.
If you want a larger version, use chunkier yarn and a bigger hook. You can even make a sleigh big enough to hold real gifts, which makes a wonderful centrepiece for a holiday table.
Common Problems and How to Fix Them
Even a small project can throw up surprises, so here are the problems I run into most often and how I solve them.
If your sleigh body feels too soft, go down a hook size. A tighter fabric will always hold its shape better. If your sleigh leans to one side, check that the front and back curves are balanced. Count your short rows on each side and make sure they match. If your runners will not sit flat, adjust the supports. Even a few millimetres of difference can make the sleigh rock.
If your trim looks uneven, undo it and try again with a steady, relaxed tension. Trim is more forgiving than you think, but it needs a consistent rhythm. If your snowflake looks floppy, block it lightly with a damp cloth and let it dry flat. It will firm up beautifully.
And if something goes wrong and you feel frustrated, put the work down and come back tomorrow. Crochet is meant to be relaxing. A fresh mind and rested hands fix most problems.
Caring for Your Handmade Ornament
Store your sleigh somewhere cool and dry, ideally in a small box lined with tissue paper. Keep it away from heat, direct sunlight, and damp places. If it gets dusty, brush it gently with a soft brush or dab it with a slightly damp cloth. Never soak or wring it, because the shape could be lost.
When you take it out the following year, gently reshape the curves with your fingers. With care, your sleigh will look just as lovely a decade from now.
Frequently Asked Questions
What yarn is best for a crochet sleigh ornament?
A smooth worsted weight cotton or cotton blend works best. It shows clean stitches and holds its shape without extra support.
What hook size should I use?
A hook between 3.25 mm and 3.75 mm works well with worsted weight yarn. Choose a smaller hook than the label suggests so the fabric is firm.
Is this project suitable for beginners?
It is best for advanced beginners or intermediate crocheters. You need to be comfortable with single crochet in the round, increases, and a little shaping.
How long does it take to make?
Most people finish it in a weekend. The base and body take a few hours, and the runners, trim, and snowflake take a few more.
Can I use a different colour?
Absolutely. Any deep jewel tone looks beautiful with cream trim. Pick a colour that suits your decor.
How big is the finished ornament?
With worsted weight yarn and a small hook, it measures about the length of your hand. You can make it larger or smaller by changing yarn and hook size.
Can I sell what I make?
If you are working from a pattern, always check the designer’s terms. If you create your own design, you are free to sell your work.
Final Thoughts
There is something wonderfully satisfying about watching a flat oval of teal yarn grow into a graceful sleigh. Every stage has its own little joy, from the first neat base to the curling runners and finally the pearl catching the light on the snowflake.
This peacock teal sleigh ornament is more than a decoration. It is a small piece of quiet winter magic that you made with your own hands. Hang it on your tree, set it on your mantel, or give it to someone you love, and it will carry a little of your warmth with it.
So light a candle, pick up your hook, and give this sleigh a try. I think you will find that it is just as enjoyable to make as it is to look at. Happy crocheting, and have a cozy, creative Christmas season.