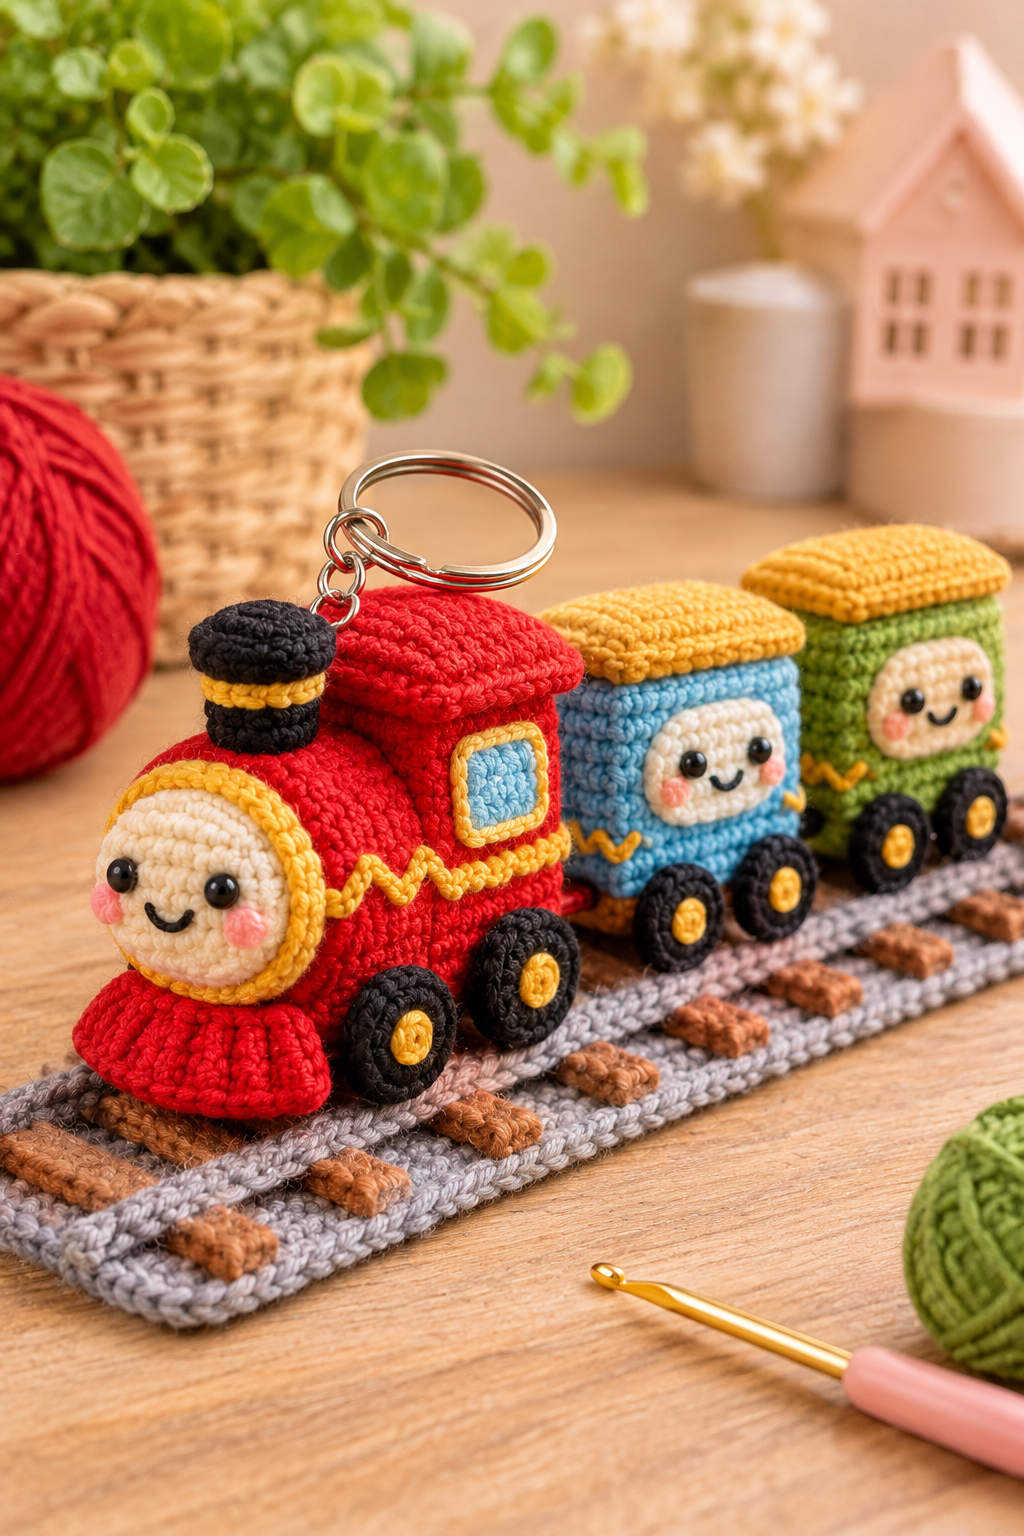
Some projects make you smile before you have even finished them. This little train crochet keychain is one of those projects. The first time I stitched the cream colored face onto the front of the engine and added two tiny black eyes, the whole thing suddenly looked alive. It had a personality. It looked ready to chug along the table and wave at everyone who walked past.
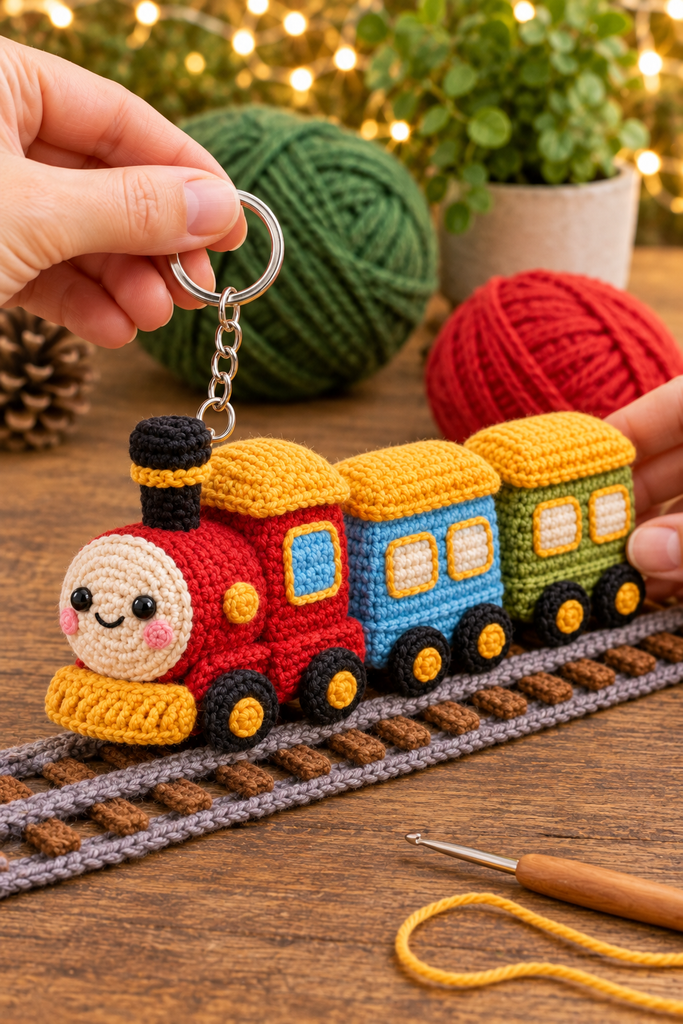
This handmade amigurumi charm is made of a cheerful red engine, a blue carriage and a green carriage, all topped with sunny yellow roofs and rolling on little black wheels with golden centers. Together they make a tiny, colorful train that clips onto a bag, a set of keys or a zipper pull. It is the kind of small gift that people hold in their hands, turn over and say, “You made this?”
In this tutorial I will walk you through the entire process. We will look at the materials, the stitches, each piece of the engine and carriages, how everything is assembled, and how to finish the keychain so it lasts. I will also share ideas for color changes, gifting and displaying your little train on its own crocheted railway track. Whether you are a seasoned amigurumi maker or you have only made a few small toys, you will find this project friendly and very satisfying.
Why This Little Train Is So Much Fun to Make
There are many reasons to love this project, and the first one is size. Because every piece is small, you can finish the whole train in a few evenings. You do not need to commit to weeks of work, and you do not need a mountain of yarn. A few scraps from your stash are enough, which makes this a wonderful stash buster for anyone who has odds and ends of red, blue, green, yellow, black and cream leftover from larger projects.
The second reason is variety. Each part of the train is built differently, so you get to practice several amigurumi techniques without ever getting bored. You will work flat circles for the wheels, a rounded cylinder for the engine boiler, rectangular boxes for the cab and carriages, and tiny squares for the windows. By the time the train is finished, you will have rehearsed shaping, color changes, stuffing, embroidery and careful sewing.
The third reason is that the finished piece is simply adorable. A train with a smiling face is hard to resist. The soft pink cheeks, the shiny black eyes and the curved little smile turn a pile of crochet shapes into a friendly character. People of all ages love it, and it makes a charming gift for train fans, new parents, teachers, coworkers and anyone who enjoys a little handmade happiness.
Finally, this project is very forgiving. If a wheel is slightly bigger than another or a window sits a little to the left, nobody will mind. In fact, those tiny differences are part of the handmade charm. A keychain is meant to be loved and used, so you can relax and enjoy the stitching.
Materials You Will Need
Let us gather everything before we begin. The supply list is short, and you may already own most of it.
For yarn, you need a smooth cotton or a cotton blend in a light worsted or sport weight. Cotton is my favorite choice for amigurumi because it gives clean, tidy stitches and holds its shape well. You will need red for the engine body, blue for the first carriage, green for the second carriage, golden yellow for the roofs, window trims, cowcatcher and wheel centers, black for the wheels and chimney, and cream for the face. A tiny amount of pink is helpful for the cheeks, and you may also want a little grey and brown if you decide to crochet the optional railway track.
For your hook, I used a 2.75 millimeter hook, which is a good size for this yarn weight. The goal in amigurumi is to crochet tightly so the stuffing does not show through the stitches. If your fabric looks loose or gappy, go down half a millimeter or even a full millimeter. A hook with a comfortable handle makes a big difference when you are working small stitches, and the golden aluminum hook with the warm brown handle in my photos is a good example of a design that feels nice in the hand.
You will also need a pair of 6 millimeter black safety eyes, or you can embroider the eyes with black yarn if the keychain is for a very young child. Polyester fiberfill is needed for stuffing, and a yarn needle with a blunt tip is needed for sewing. A pair of small sharp scissors, stitch markers and a few straight pins will make assembly easier. For the hardware, pick up a small metal split ring, a short length of chain and a keyring or lobster clasp. Look for sturdy metal pieces because a keychain gets tugged and dropped often.
If you want to add the cheeks with a more polished look, use a little pink embroidery thread or a small amount of blush powder applied with a cotton swab. Both methods work nicely.
Abbreviations and Techniques
This pattern is written in US crochet terms. The stitches you need are the magic ring, chain, slip stitch, single crochet, increase and decrease. An increase means working two single crochet into the same stitch, and a decrease means working two single crochet together. Most pieces are worked in continuous spirals unless I say otherwise, so a stitch marker is useful for keeping track of the start of each round.
A few techniques deserve special mention. Working in the back loop only creates a clean edge where one part of a piece ends and another begins, and it will be used on the cylinders and boxes so that the sides rise neatly from the base. Changing colors in the round is also important, especially for the wheels and the face. When you are about to finish the last stitch in one color, pull the new color through to complete that stitch. This keeps the join tidy.
Finally, always leave a long tail when you fasten off a piece you plan to sew onto another one. Cutting the tail too short is a frustrating mistake, and a good eight inches saves a lot of trouble later.
Crocheting the Engine Face and Boiler
The engine is the star of the train, so it is the best place to begin. The face and the boiler are crocheted as a single piece, starting with the cream circle and working outward into the red cylinder. You can see this stage in my photo, where the cream circle sits at the end of a growing red tube while the red yarn trails up to the hook.
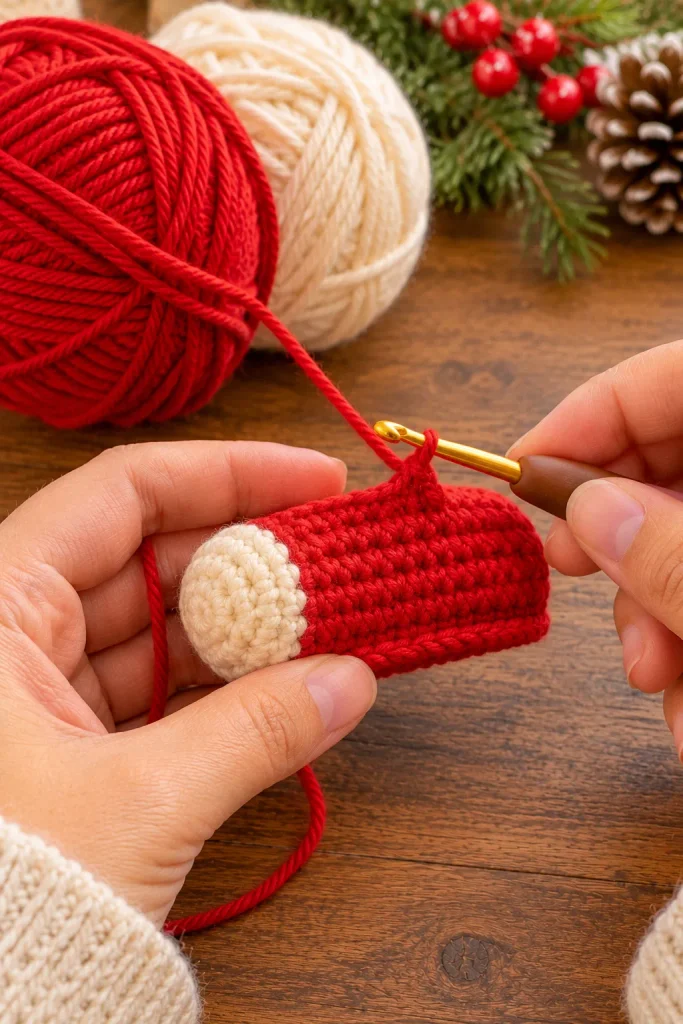
Start with the cream yarn and make a magic ring. Round 1: work six single crochet into the ring and pull it tight. Round 2: increase in each stitch around, which gives you twelve stitches. Round 3: work one single crochet, then one increase, and repeat all the way around, giving you eighteen stitches. Round 4: work two single crochet, then one increase, and repeat around, giving you twenty four stitches. This flat cream disk becomes the smiling face.
For Round 5, switch to red yarn and work in the back loops only, with one single crochet in each stitch around. This step creates a crisp ridge between the face and the body, and it makes the cylinder rise straight up from the circle. From Round 6 to Round 15, work one single crochet in each stitch around, keeping a stitch marker in the last stitch of every round. You should now have a tube about two inches long.
Stuff the tube firmly. A well stuffed boiler looks plump and professional, while a soft one will slump when the keychain hangs from your keys. Push the fiberfill into the cream circle first, so the face is nicely rounded, and then fill the rest of the tube. Close the opening by flattening it gently and working a slip stitch across, or by sewing it shut with the yarn tail. Fasten off and weave in the end.
Before moving on, set the safety eyes. Place them between Round 3 and Round 4 of the cream disk, about five stitches apart, and secure the backs firmly. With a strand of black yarn, embroider a small curved smile just below and between the eyes. Finally, add the cheeks by embroidering small pink circles or lightly brushing on blush. I like to place the cheeks just outside and slightly below the eyes, because this gives the face the sweetest expression.
Making the Engine Cab and Roof
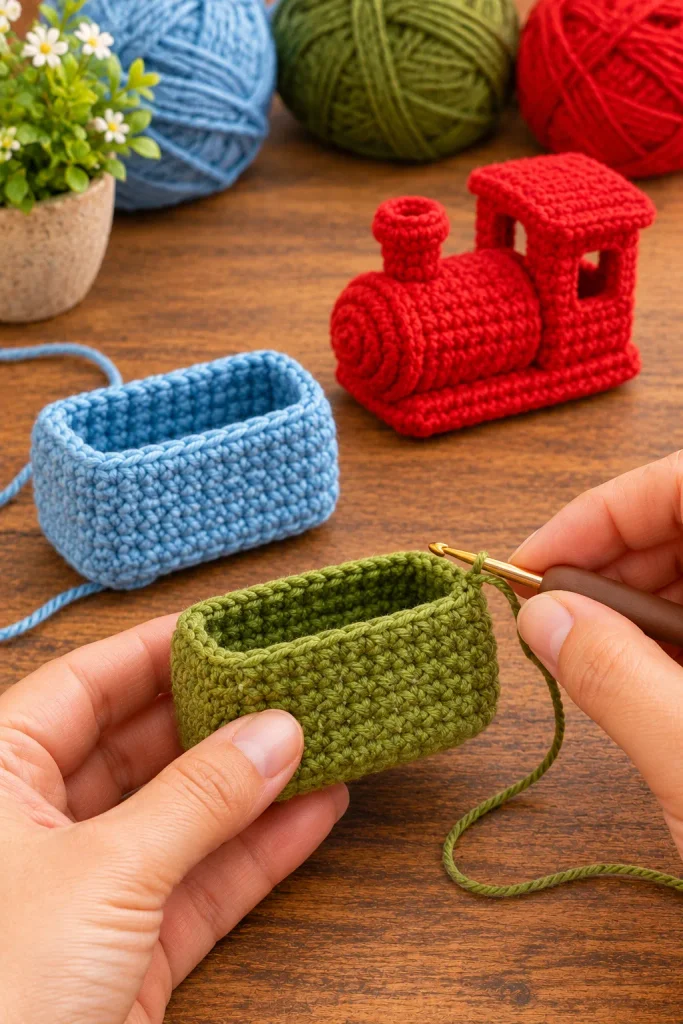
With the boiler finished, move on to the cab, which is the tall boxy part at the back of the engine. In my photo of the pieces laid out on the table, you can see how the cab rises above the boiler with an open window on its side, and how the whole shape sits on a flat base. It is a very simple structure made from stacked rectangles.
To make the cab, use red yarn and chain 9. Round 1: work two single crochet in the second chain from the hook, one single crochet in each of the next six chains, then three single crochet in the last chain. Turn and work along the other side of the chain, with one single crochet in each of the next six chains and one single crochet in the base of the first stitch. Join and you should have eighteen stitches. Round 2: work two single crochet in each of the three stitches at each end, and one single crochet in each stitch along the sides, giving you twenty four stitches.
Round 3: work in the back loops only, with one single crochet in each stitch around. From Round 4 to Round 13, work one single crochet in each stitch around. This forms the walls of the cab, which should be a rounded rectangle about one inch tall. Stuff lightly, but do not overfill because you want crisp edges rather than a bulging balloon. Fasten off and leave a tail.
The roof is a slightly larger and flatter piece in yellow. Chain 9 and work Rounds 1 and 2 exactly as for the cab. In Round 3, work two single crochet into each of the first three stitches at each end, and one single crochet in each of the stitches along the sides. You will end with thirty stitches and a roof that overhangs the cab by a little, which gives the train its charming cartoon look. Slip stitch to join, fasten off and leave a long tail. We will sew it on later.
The Chimney with Its Golden Band
No steam engine is complete without a chimney, and this tiny piece adds so much personality. Using black yarn, make a magic ring and work six single crochet. In Round 2, increase in each stitch to reach twelve. In Round 3, work one single crochet and one increase around, reaching eighteen. In Round 4, work in the back loops only, with one single crochet in each stitch around. Round 5 is one single crochet in each stitch. In Round 6, work one single crochet and one decrease around, bringing you back down to twelve stitches.
Now switch to golden yellow for Round 7, working in the back loops only, with one single crochet in each stitch. This creates the little band that circles the chimney. Switch back to black for Rounds 8 and 9, working one single crochet in each stitch. Stuff the chimney lightly, fasten off and leave a tail for sewing.
When it is finished, you will have a small black cap with a ridge, a yellow ring and a short stem. The curved edge of the cap is formed by the increases and the back loop round, and it looks very much like the old fashioned stacks on a classic steam locomotive.
Crocheting the Carriages
The carriages are made the same way as the cab, which makes the pattern quick and satisfying. Each one is a rounded box with a yellow roof and four wheels. You can see in my photo how the blue carriage sits next to the green one, both of them open at the top and showing the neat, even rows of single crochet inside.
For the blue carriage, chain 9 and follow the same instructions as for the cab. Work Rounds 1 and 2 to make the base, then work Round 3 in the back loops only. Continue with single crochet in every stitch until you have completed twelve rounds in total. Stuff gently, fasten off and leave a tail. The green carriage is made identically in green.
For each roof, use golden yellow and follow the same method as the cab roof. Make one yellow roof per carriage, and set them aside for assembly.
If you want your train to be a little longer, you can make a third carriage in a fourth color. Purple, orange or a soft pink would look great. A longer train swings more freely on a keychain, though it is also more likely to catch on pockets, so keep that in mind.
Wheels and Little Details
The wheels are small circles with a golden center, and you will need twelve of them for the whole train, which means four for the engine and four for each carriage. I recommend making them all at once so that they are consistent in size.
Start with golden yellow and make a magic ring. Work six single crochet into the ring. Pull it closed and join with a slip stitch. Now switch to black. In Round 2, increase in each stitch around to reach twelve stitches. In Round 3, work one single crochet and one increase around, giving you eighteen. Join with a slip stitch, fasten off and leave a tail of about six inches. You now have a flat disk with a yellow center and a black tire.
Next come the windows. The engine cab has one blue window with a yellow trim, while each carriage has two cream windows with yellow trim. To make a window, chain 6 with the main color. Work one single crochet in the second chain from the hook and in each of the next four chains. Turn and work one single crochet in each of the five stitches. Repeat until you have five rows and a small square. Fasten off. Now join yellow yarn to any corner and work one round of single crochet around the entire square, with two single crochet in each corner. Fasten off and leave a tail for sewing.
You will need one blue window for the engine and four cream windows for the carriages. There are also two tiny round gold buttons on the side of the boiler, which are made from a magic ring with six single crochet, followed by a round of increases to reach twelve. These add a lovely finishing touch to the engine.
Finally, make the cowcatcher, which is the plump yellow bumper at the front of the train. Chain 8 in yellow and work seven single crochet along the chain. Turn and work twelve rows of single crochet in the back loops only to create a ribbed texture. Fold the piece in half, seam the sides and stuff lightly. It should look like a small yellow cushion. Fasten off and leave a tail.
Assembling the Train
Now for my favorite part. Lay all your pieces out on a flat surface and check that you have everything: the boiler and face, the red cab and its yellow roof, the chimney, the cowcatcher, the two carriages with their yellow roofs, the windows, the two gold buttons and twelve wheels.
Start with the engine. Position the boiler so that the cream face points forward and the red tube rests against the front of the cab. Pin it in place and stitch the two pieces together using the tail from the boiler, working small stitches all around the joint. The boiler should sit a little lower than the cab roof, so the roof stands out above it. Sew the yellow roof onto the cab, making sure it overhangs evenly on both sides, then stitch the chimney onto the top of the boiler near the front of the cab. Sew on the cowcatcher beneath the face so it peeks out like a smile of yellow stitches. Add the blue window to the side of the cab and the golden buttons to the side of the boiler.
Next, assemble each carriage. Sew the yellow roof onto the open top of the box, using the long tail and working around the edge. Sew two cream windows onto each side, spaced evenly. Take your time here, because straight windows make the train look tidy and cared for.
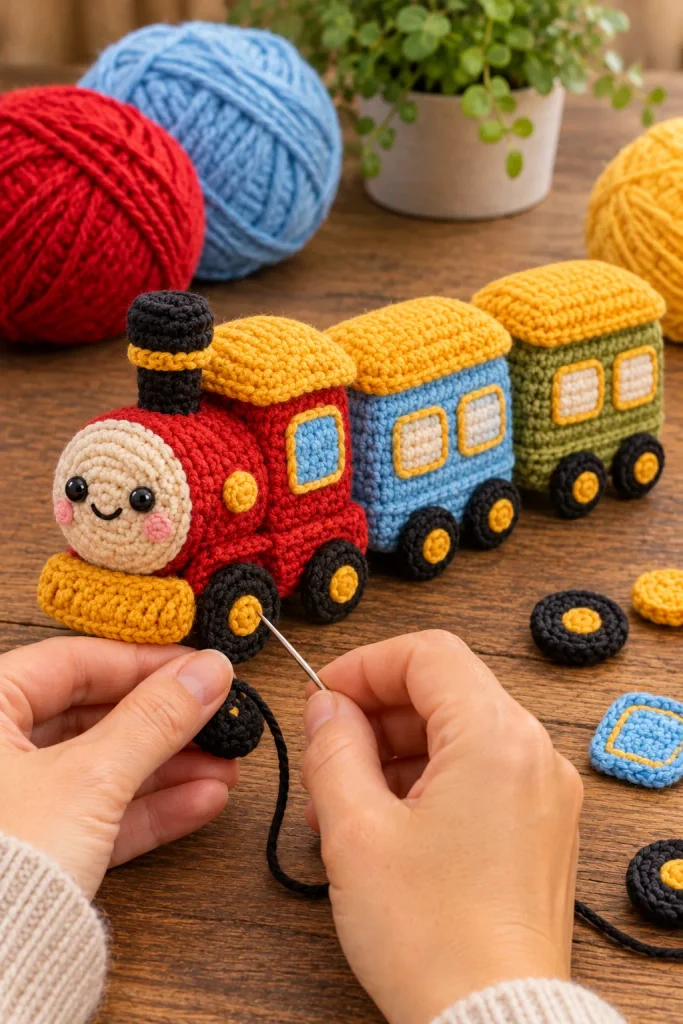
Then comes the wheel stage, shown in my photo. Pin two wheels to each side of the engine, near the bottom and toward the front and back, and thread your needle with the black tail. Stitch around the edge of the wheel, going through the body of the toy, and then take a few stitches through the center so the wheel sits flat. Repeat with every wheel on the engine and both carriages. Taking the time to place the wheels at the same height keeps the train from looking crooked.
Finally, join the three vehicles. The easiest method is to crochet two short links, each made from a chain of four stitches in black yarn joined into a ring with a slip stitch. Sew one end of each link to the back of the engine and the other to the front of the blue carriage, then do the same between the blue and green carriages. This allows the train to bend slightly as it moves, which looks adorable and helps it hang naturally from a keyring.
Attaching the Keychain Hardware
A keychain needs to be durable, so the way you attach the hardware matters a great deal. I recommend making a small loop in black or yellow yarn by chaining twelve stitches and joining the end to the beginning with a slip stitch. Fold the loop in half and sew it securely to the top of the engine, just behind the chimney, going through both the roof and the boiler so the weight is spread out. Use at least eight to ten stitches and knot the yarn firmly on the inside.
Thread a small jump ring through the loop and add a short length of chain, followed by the split ring or lobster clasp. In my finished photo, you can see a short chain between the train and the large ring, which gives the toy room to swing without hitting your hand when you pull your keys out. If you prefer, you can attach a lobster clasp so the train can be clipped onto a bag strap or a belt loop.
Before you call it finished, give the whole piece a gentle tug. If anything feels loose, add a few more stitches. Small parts like wheels and windows can come undone if they are only lightly sewn on, and a little extra security means the keychain will survive daily life.
Optional Crocheted Railway Track
In my finished photo, the train sits on a charming crocheted track made from grey rails and brown sleepers. This is entirely optional, but it is a lovely prop for photographing your work, and it also makes a nice display piece or table runner.
To make the track, use grey yarn and chain 60. Work one row of single crochet along the chain, then another along the opposite side, to create two long parallel rails. Use brown yarn to crochet small rectangles, each about one inch wide and a quarter of an inch tall, and sew them across the rails at even intervals to make the sleepers. When you lay the train on the track, you will see just how realistic and playful it looks.
You can make the track as long as you like. A short length is perfect for photographs, while a long one can be draped along a shelf or around a Christmas tree. I even know a crafter who made a loop of track for a holiday display and let the keychain trains run around it.
Color Ideas and Variations
The red, blue, green and yellow scheme is classic and cheerful, but this little train looks great in almost any palette. A pastel version in mint, peach, lavender and cream is perfect for a baby shower or a nursery. A rainbow version with a different color for each carriage is wonderful for a child’s backpack. For a festive look, make a Christmas train with a red engine, a white carriage and a green carriage, trimmed with gold.
You can also change the face. Give the engine sleepy eyes with embroidered curved lines, or add tiny eyelashes for a girl train. A small felt flower or a bow on top of the cab can turn the engine into a gift for a special occasion. You might even personalize each carriage with an embroidered initial or number so that a set of trains can represent a family.
If you want a larger toy rather than a keychain, simply use a thicker yarn and a bigger hook. A chunky version made with a 4 millimeter hook is soft, squishy and perfect as a nursery decoration. In that case, skip the hardware and add a loop for hanging or leave it freestanding on a shelf.
Gift Ideas and Uses
Because this train is small, it fits into so many gift ideas. Slip one into a birthday card for a child who loves trains. Tuck one into a Christmas stocking or hang it on the tree as an ornament. Attach it to a gift bag with a ribbon and let the recipient keep it as a bonus present. A set of three or four trains in different colors makes a lovely party favor for a train themed birthday.
It is also a great item to sell at craft fairs, in online shops or at school markets. The pieces are quick to make, the materials are inexpensive and the finished keychain photographs beautifully against a wooden table with cozy props. Customers enjoy the personality of the smiling engine, and many return to buy matching sets as gifts.
For parents, a little crochet train hanging from a diaper bag or stroller adds a bit of whimsy. Just remember that safety eyes and small parts are not suitable for babies and toddlers, so embroider all the details if the toy is intended for a very young child.
Troubleshooting Tips
If your boiler is lopsided, check that you did not accidentally skip or add a stitch in one of the early rounds. Count your stitches at the end of each round during the face, because small errors in the first rounds are magnified later.
If your boxes feel floppy, you may be crocheting too loosely or stuffing too lightly. Try a smaller hook and add a little more fiberfill. If, on the other hand, the boxes look lumpy, you may have overstuffed them. Pull out some of the filling and smooth the surface with your fingers.
If the wheels do not sit flat, stitch through the center of each wheel one extra time and pull gently. Pinning the wheels first and checking from several angles will help you place them evenly.
If the roofs look wavy, make sure you have worked the increases at the ends only and kept the sides straight. A gentle press with your fingers will smooth them out.
If the face looks different from mine, do not worry. Move the eyes slightly closer together or further apart until you like the expression. Small adjustments can completely change the mood of a toy.
Caring for Your Crochet Train
A crochet keychain lives a busy life, so a little care goes a long way. Avoid soaking it in water. If it becomes dirty, clean it gently with a damp cloth and a tiny drop of mild soap, then let it dry flat. If you keep it in a bag or pocket, try not to crush it under heavy objects.
If the yarn begins to fuzz, you can trim stray fibers carefully with small scissors. Store the toy in a cool dry place when it is not in use, and check the hardware occasionally to make sure the ring and chain are still secure.
Frequently Asked Questions
How long does it take to make this keychain? Most makers finish it in about six to eight hours, spread over a few evenings. The wheels and windows take the longest because there are so many small pieces.
Is this a good beginner project? If you know how to make a magic ring and work single crochet in the round, you can make it. It is a great step up for someone who has finished one or two simple amigurumi.
Can I use acrylic yarn? Yes, though cotton gives a crisper finish. If you use acrylic, choose a smooth yarn and crochet tightly.
What can I use instead of safety eyes? Black yarn French knots, black beads sewn on securely or small pieces of black felt all work well.
Can the train go through the wash? It is better to spot clean it. The hardware and the stuffing do not like the washing machine.
Can I sell the toys I make from this pattern? Many crafters sell small handmade items. If you share photos online, a link back to the original pattern is always appreciated.
Final Thoughts
There is something wonderful about making a toy small enough to carry with you every day. Each time you pull out your keys, the little train will remind you of the evenings you spent shaping its wheels and stitching its smile. It is a tiny piece of happiness that travels with you wherever you go.
I hope this tutorial gives you everything you need to start your own railway of handmade charms. Begin with the red engine, add the colorful carriages, attach the wheels and then hang your finished train from your favorite keyring. Once you see how cute it looks, you may find yourself making a whole station full of them.
If you make one, I would love to see it. Share a photo, tell me which colors you chose and give your train a name. Happy crocheting, and may all your stitches roll along smoothly.